

13 Jul The History and Process of Screen Printing
Screen Printing: Past week in Delhi, we started developing a screen print on custom-made chiffon linen and satin silk created with a weaver in Varanasi. Our team learned and documented the process of screen creation, paint and print development. I found it fascinating to understand the processes and see our ideas come to life. I thought of sharing my research and information on screen printing with our readers.
 History of Screen Printing
Screen printing originated in the East in China during the Song Dynasty (960–1279 AD) to transfer designs onto fabrics.
From China, it spread to other Asian countries like Japan. In Japan, they used to make stencils of the design by cutting the paper. Mesh was still used. However, Ink was forced through the mesh onto the fabric with stiff brushes. The Japanese soon adopted this technique and improved upon it, creating an art form called katagami. Over the years, the basic concept of using a mesh-based screen to create prints has remained the same. However, the technique has evolved and become more immaculate.

Screen printing was introduced to the western world in the late 18th century, thanks to the trade routes with Asia. However, it became widely accepted in the west only once there was enough silk also imported through the trade routes. The artist Andy Warhol popularised screen printing as an artistic technique with his screen-printed portrait of the actress Marilyn Monroe printed in bold colors.

I believe it was the use of the squeegees and application of processes similar to Photographic processing that made screen printing a likable option for creating high definition prints.
Photo Emulsion Screen Printing Process
I am sharing the step-by-step process that the artisans followed to develop our screenprint.
Note: The number of screens to be developed per print depends on the number of colors used in the artwork. Each color will have its own screen. Since our artwork uses eight colors, therefore, we developed eight screens for this print.
Step 1) The whole print is separated into eight digital artworks- one for each of the eight colors. Each artwork is then printed on butter paper. We did all of his work digitally.
We have eight digitally printed artworks

Step 2) A wooden or aluminum frame is constructed based on the size of the artwork. Our artwork is 22″ by 24.”

Step 3) The wooden frame is taped with a mesh ( We used Nylon mesh). There should be enough tension on the mesh to achieve a good quality print. Only an experienced artisan can tell about the correct tension of the mesh.

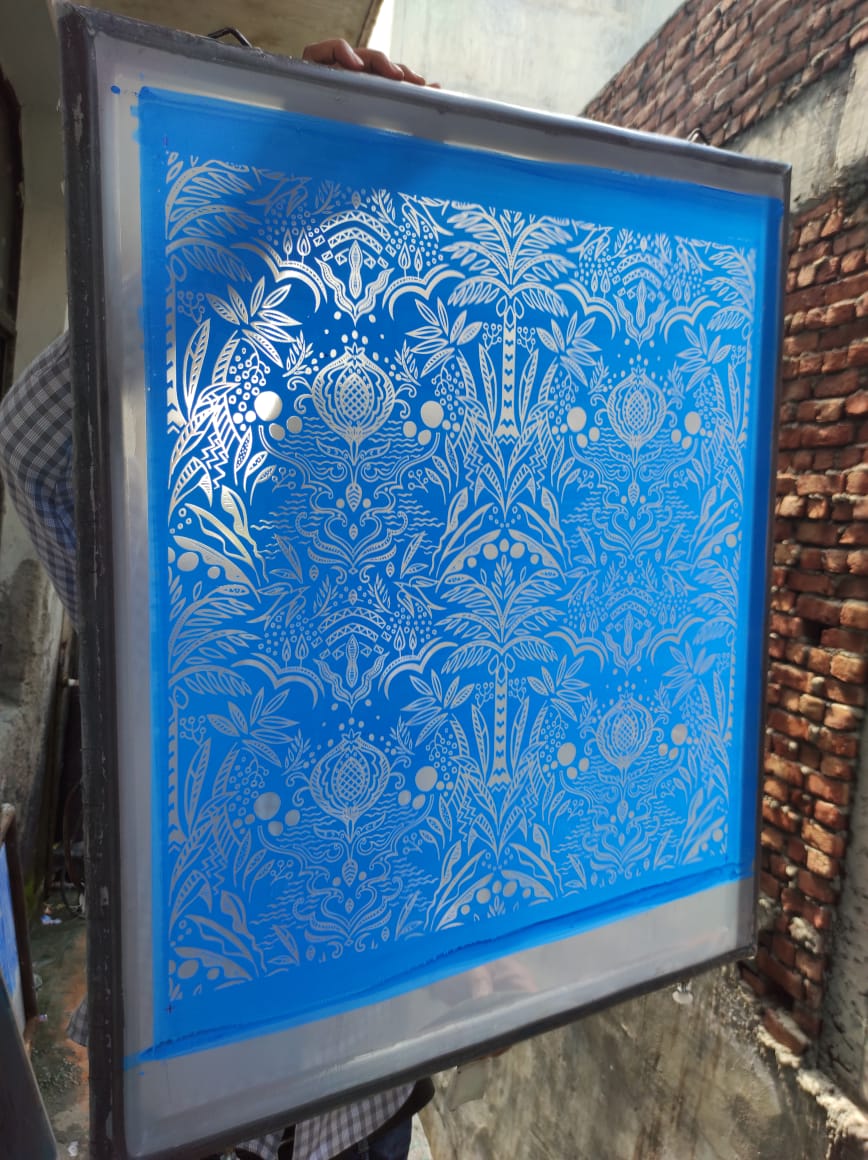
Step 4) A mixture of sensitizer and photo emulsion, which almost looks like thick blue paint, is applied on both sides of the mesh.
Step 5) The screen is then left to dry in the dark for half an hour.


Step 6) The chemical coated screen is then put on top of the butter paper which has the design printed on it. They are kept on an exposure table, a glass table with light sources beneath them. The screen is covered with a black cloth and a mixture of sand and gravel to ensure that the screen absorbs all the light. And to ensure there is enough weight to imprint the butter paper design on the screen. The whole setup is left like this for 5-10 mins.

Step 7) This is the step where the magic happens. The mixture of photo emulsion and sensitizer transfers all the black ink of the butter paper on the screen. The screen is washed with pressured water from a hose. And the actual print from the butter paper starts to appear on the screen.

Step 8) The paints are prepared, and almost 1/2 a liter of paint is put at the bottom of the screen, which is spread across the screen in an upward and downward stroke of the squeegee.

The size of the perforations on the mesh is apt to allow for the seepage of the right amount of liquid paint to impress a beautiful print on the fabric’s surface.

Once the paint has dried, the fabric is heat-treated for several minutes, also called curing. This creates a fine print with a lovely soft hand. The screen is nicely washed to get rid of all the remaining paints and stored for future use.
Innovation – Usually screen prints and block prints are done on lighter color backgrounds otherwise the fabric will feel stiff. Since our artwork used dark color background therefore we used a special paint development process so that the silk satin feels soft and drapey.

ABOUT THE AUTHOR
 Nidhi Garg Allen is an alumnus of Parsons School of Design and Adjunct Professor at the Fashion Institute of Technology. She is a technologist turned artisan entrepreneur and the founder and CEO of Marasim. Marasim based in NYC is committed to preserving artisanal textiles that make use of regional techniques without uprooting craftspeople from their native communities.
No Comments